Install the Develop Package
Step 1: Insert AC682 into USB port, then you will see a new device appear named ”Zoom” on the
desktop as shown in Figure 1
(Figure 1 the CDROM named “Zoom”)
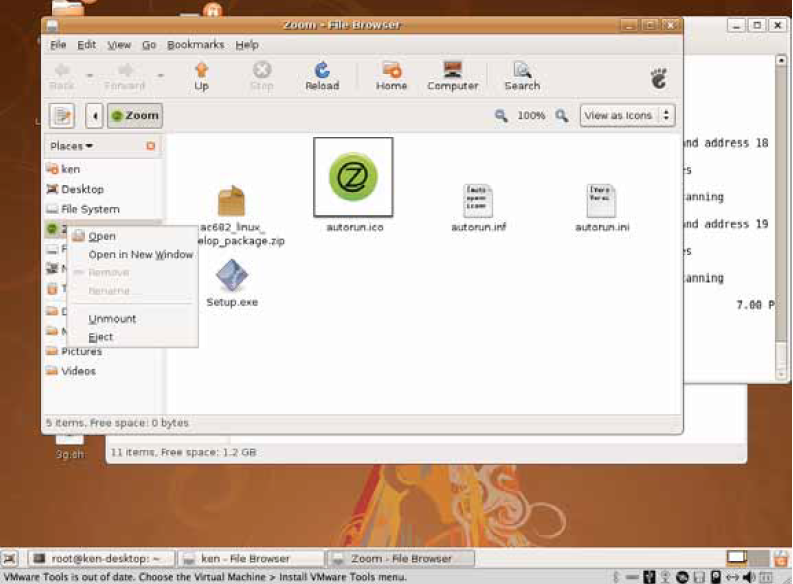
Step 2: Double-click CDROM icon “Zoom” to explore CDROM, then copy the file “ac682_linux_develop_package.zip” to desktop, as shown in Figure 2
(Figure 2 copy the linux develop package from CDROM)
Step 3: Click the ZIP file icon “ac682_linux_develop_package.zip” to extract to desktop, which as
shown in Figure 3.
(Figure 3 extract the linux develop package)
Step 4: Run the application program “Terminal” in system menu “Applications->Accessories”.
Shown as bleow Figure 4.
(Figure 4 enter Terminal)
Step 5: Execute the following commands strictly shown as below. Create a directory “zoom”, then
copy the program “modemon” to “zoom”, as shown in Figure5.
mkdir zoom
cd Desktop
cd release
cp –r modem_application/* ~/zoom
Run the following commands to check the file attribute of program “modemon”.
cd ~/zoom
cd modem_on
ls -la modemon
If it’s not an executable file, it will return “-rw--------”.Then you should execute “chmod”
command to set the file as executable.
chmod u+x modemon
Remark:
When you use “ls” command to view an executable file, it shows as green color.
(Figure 5 copy “modemon” program to “zoom” directory)
Step 6: Execute following commands, copy ppp configuration files to directory “etc/ppp”, which is
shown in Figure 6.
sudo –s
cd Desktop
cd release
cd ppp_dialer_script_3D
cp –r ppp/* etc/ppp
(Figure 6 copy the ppp configuration files to etc/ppp)
Modem Detection
Step 1: Click icon “CDROM”, and press “
Eject” as Figure 7. This eject operation will change
AC682 from CDROM mode to modem mode.
(Figure 7 eject the CDROM)
Step 2: Execute the following commands to load USB driver for AC682 modem. Then you need to
check whether the USB driver is loaded successfully ,as shown in Figure8
sudo -s
modprobe usbserial vendor=0x19D2 product=0xFFDD
ls /dev/ttyUSB*
If the results show you like Figure 8, it means that USB driver has been loaded for AC682
modem successfully.
(Figure 8 use modprobe to load USB driver for device)
Setp 3: Execute the following commands to start up USB port of AC682 modem. If the modem is
opened successfully, there will be a prompt, as shown in Figure 9.
cd zoom
cd modem_on
./modemon
Remarks
We have installeded the “modemon” program in ~/zoom/modem_on directory.
(Figure 9 use modemon program to start USB port of device)
Dial-up Access
Step1: Execute the following commands, setup a dial-up connection as shown in Figure 10.
pppd call cdmadialer &
(Figure 10 use pppd command to setup dial-up connection)
Step2: Execute the following commands to check the status of internet connection. Please refer
to Figure 10.
tail /var/log/syslog
Step3: Execute the following commands to disconnect network connection, refer to Figure 11.
killall pppd
(Figure 11 use killall pppd command to disconnect network connection)
Step4: When the internet connection is disconnected, you must run the modemon program once
again, as shown in Figure12.
(Figure 12 run modemon program once again)
PART2 ubuntu 8.04
Ubuntu 8.04 is similar with ubuntu 10.04 on AC682.
Here one problem is described when AC682 uses with ubuntu 8.04
When you insert the AC682 device into the USB port of PC which is run with ubuntu 8.04,
a CDROM named Zoom will be appeared on the desktop as shown in Figure 13.
(Figure 13 the CDROM named Zoom in ubuntu 8.04)
Because of the shortcoming (or bug) of ubuntu 8.04, you should not pull out AC682 device
from the computer directly before you eject it, otherwise, there will be one “dead device”
existed in the ubuntu 8.04 system. So if you insert AC682 device again, there will be
appeared another CDROM also named as Zoom, you will get two “Zoom” CDROM in the
File Browser as shown in Figure 14. In fact, one of them is a “dead device”.
(Figure 14 two “Zoom” CDROM in the File Browser)
To remove the “dead device”, one way is to restart the computer, another way is execute
“umount” command. First you should login into terminal with your linux account, and
Execute “df” command to list the device existed in the system as shown in Figure 15. If
you are sure which the “dead device” is, you should execute “umount” command to
remove it. The command in Figure 15 is:
umount /dev/scd1
(Figure 15 use umount command to remove the “dead” device)
When the AC682 device is appeared as a CDROM, if you want to pull it out in a right way,
the CDROM will be ejected before you pull it out as shown in Figure 16.In this way, there
will be no “dead device” in the system.
(Figure 16 eject the CDROM before you pull it out)