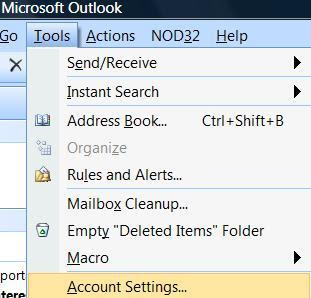
Search This Blog

Surfe.be - Banner advertising service

Regional language related problem at Installation of ZTE AC2726

Symptom: At the time of installation of ZTE AC2726 modem I get an error message that “Installer.exe has stopped working”.

Or

I am unable to run ZTE AC2726 modem interface after changing regional language in Windows Vista or 7.


_________________________________________________________________________________


Solution: This is a very common problem we usually face at installation of ZTE modem in Windows Vista or upper versions. If any language is selected in regional option except English (United State), then this modem is unable to be installed or run the application (if already installed). Follow the below stages to solve.


1. Click Start> Control Panel> Regional and Language Options> set English (United State) in Format.


2. Remove the previous installation of Zoom application (which was not successful installed) from Control Panel> Program and Features (Add and Remove Programs in Windows Xp).


3. Now ZTE AC2726 modem will be installed successfully


Auto Disconnected Problem’s Solution

Symptom: we get connection properly and we can browse web site, but suddenly the connection disconnected automatically, needs PC restart to get connection and it occurs frequently.


___________________________________________________________________________


Solution: To solve this problem we need follow three stages,


Stage 1: Disable auto windows update from control panel,

Click Start > Settings> Control panel> Administrator tools> Services and disable Windows Update service (Auto Update mentioned in Windows Xp).


Double click on Windows Update (Auto Update in Windows Xp) service and select Disable in Startup type and click Apply button.


Stage 2: Enable windows Firewall.

Click Start> Control Panel> Windows Fire wall> Turn Windows Firewall on or off

Select Turn on Windows Firewall.


Stage 3: Need to edit regedit of windows,


(+) HKEY_LOCAL_MACHINE
(+) System
(+) CurrentControlSet
(+) Services
(+) NetBT (Double Click) > Parameters > TransportBinaryName> Delete the value (\Device\) then click Ok


Second Stage: Click Start> Run and type regedit
(+) HKEY_LOCAL_MACHINE
(+) Software
(+) Microsoft
(+) Ole (Double Click) Change the value of EnableDCOM from Y to value N
First Stage: Click Start> Run and type regedit

Unable to browse reason of Default Gateway

You may face a problem that modem installed properly, dialup connection ok but unable to ping any web site and unable to browse any web page and showing the below message as “The Page Cannot be displayed”.


If we executive ipconfig command in command prompt then will get below output where Default Gateway field shows blank IP address.


1). To solve this problem go to Control Panel> Network Connection> select and right click the dial-up connection which one you use to get connection from your ISP> Click on Properties.


2). Go to Networking Tab of this dialup connection> select Internet Protocol (TCP/IP)> click on Properties button.


3). Select Obtain an IP address automatically and Obtain DNS server address automatically. Now click on Advance button.


4). Mark the checkbox of Use default gateway on remote network.


5). Now executive the ipconfig command and browse the website.

Unable to browse reason of proxy server

You may face a problem that modem installed properly, dialup connection ok, pinging the web site, but unable to browse any web page by Internet Explorer or Firebox and showing the below message as “The proxy server is refusing connections”.

This is a Proxy server related problem and need to configure individual Web Browser.


Mozilla Firebox

For Mozilla Firebox> (Menu bar) Tools> Options> Advanced> Settings > Select No Proxy option.


Internet Explorer

For Internet Explorer (Menu bar) Tools> Internet Options> Connections Tab> LAN Settings… > Unmark the option Use a proxy server for LAN and tick mark Automatically detect settings.


Google Chrome

Customize and Control Google Chrome > Preferences


Click on Change Proxy Settings... button and select Direct Internet Connection


Opera

Click Opera > Settings > Preferences


Now click on Advanced tab > Network >  Proxy Servers...


Cookies Related Problem at Internet Browsing

Sometimes you may face a problem to login in any web site mostly mail related sites that unable to login because of rejecting cookies to save in local computer.


This problem will be solved by changing your browser(s)’ privcy settings.


Figure (1): For Internet Explorer go to menu bar Tools > Internet Options > Privacy and select privacy settings as Medium.


Figure (2): For Internet Firefox, go to menu bar Tools> option . . .> Privacy> Firefox will select as Remember history or select Use custom settings for history and tick mark Accept cookies from site and Accept third-party cookies.

Unable to get DNS after dailup connection

Problem Description: I would try and open Firefox while connected to the network, it'd take maybe 3 minutes to actually open, and then it would never load a page. When I tried viewing a webpage on IE, it gave me an error that the DNS Server could not be reached. I ran the diagnostics tool, and it returned an error: "Cannot communicate with primary DNS server. Network Diagnostics pinged the server, but did not receive a response."

Briefly: Modem connected with Internet, first few minutes browsing done properly, after that unable to browse, if pinged no DNS server found.


Probable Solution - Reset Log Files: Open up a command prompt (Start > All Programs >Accessories > alternate click on Command Prompt > select "Run as Administrator"

Type the bolded commands into the command prompt window:

Reset WINSOCK entries: netsh winsock reset catalog
Reset IPv4 TCP/IP: netsh int ipv4 reset reset.log
Reset IPv6 TCP/IP stack: netsh int ipv6 reset reset.log

When finished reboot


Probable Solution - Disable the IP Helper service: Open services.msc by clicking Start> Run. Scroll down to the IP Helper service, right click on it and select Properties in the dropdown box that says "Automatic" or "Manual", set it to Disabled and then click on "Apply". Then click on "Stop" to stop the service from running in the current session. Click OK to exit the dialog.


Probable Solution - Disable IPv6: Open ncpa.cpl by clicking Start> Run. Right click on each network connection and select "Properties" to remove the checkmark from the box next to "Internet Protocol Version 6 (TCP/IPv6) and theb click OK to exit the dialog. Note: For Windows 7, Vista, etc.


Probable Solution - Disable the DHCP Broadcast Flag: By following below statements,
1. Hold the Windows key and type R, enter regedit and press Enter.
2. Locate and then click the following registry subkey:
3. HKEY_LOCAL_MACHINE\SYSTEM\CurrentControlSet\Services\Tcpip\Parameters\Interfaces\{GUID}
4. In this registry path, click the (GUID) subkey to be updated.
5. If the key DhcpConnForceBroadcastFlag does not exist, use the Edit menu, point to New, and then click DWORD (32-bit) Value. In the New Value #1 box, type DhcpConnForceBroadcastFlag, and then press ENTER. If the key exists, skip this step.
6. Right-click DhcpConnForceBroadcastFlag, and then click Modify.
7. In the Value data box, type 0, and then click OK.
8. Close Registry Editor.

NOTE: You should do this for each and every GUID subkey.
NOTE2: (GUID) is a mnemonic for the individual subkeys, the actual text "GUID" does not appaer.

Hotmail Configuring in Outlook

1. Firstly, run Microsoft Outlook 2007. Then click on Tools on the menu bar and select Account Settings from the pull down menu.


2. In the Account Settings dialog, click on New… button.


3. In Add New E-mail Account wizard, when prompt to choose e-mail service, select Microsoft Exchange, POP3, IMAP or HTTP. Then click on Next button.


4. You will then come to Auto Account Setup section of the wizard. Enter the Your Name which you want to embed on outgoing emails, E-mail Address which should be ended with @hotmail.com or @msn.com, and the Password for the email account. Click on Next button when done. Note that you should connected online to Internet so that Outlook can retrieve server settings automatically without having to manually configure it.


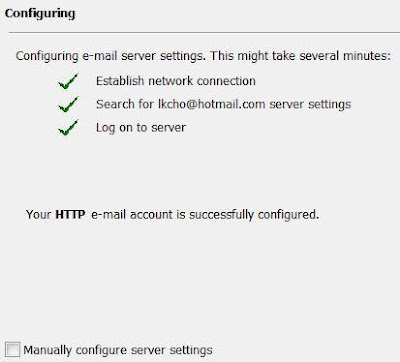
5. Outlook should be able to automatically configure the Hotmail HTTP e-mail account server settings with a congratulation message. In this case, the account setup process is completed, and click on Finish button.


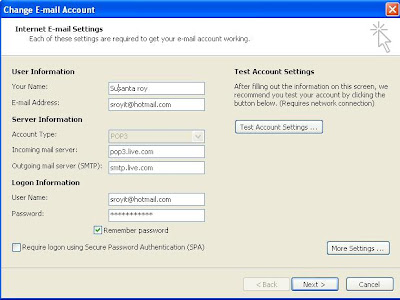
6. If Outlook has problem or fail to auto configure the Hotmail account, you will be bring to Internet E-mail Settings dialog. You can also tick the “Manually configure server settings” and then click “Next” to come to this page. Here you can configure all settings manually, including changing the identity name for outgoing emai or label name for this account in Outlook, account type, HTTP service provider, server URL, user name, password, whether to remember the password or not and etc.


Click on Close button to exit Account Settings dialog.

Once Hotmail account is added and setup in Microsoft Outlook, there will be a new mail item folder named account to your @hotmail.com email address (unless you change it).

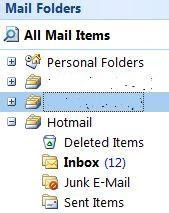
This new folder will store and synchronize all the downloaded mails and messages from Hotmail, enable you to easily read, reply or create Hotmail message from Microsoft Outlook 2007.


POP Setting for Hotmail

Windows Live Hotmail / MSN Hotmail finally is adding POP3 and SMTP support for its free user base. Previously, POP3 and SMTP access is only available to paid Windows Live Hotmail Plus subscribers. POP3 and SMTP protocols allows user to use desktop-based or mobiled-based (such as iPhone) email client to access Hotmail mailboxes without opening web browser to browse to web-based Hotmail online.

The free POP3 and SMTP access will be available to all, each and every Hotmail users eventually. However, during the initial rolling out stage, the POP3 and SMTP support on the Hotmail account will be enabled in stage by country and regional market. Windows Live blog announced that Hotmail users in the United Kingdom, Canada, Australia, France, Japan, Spain, Germany, Italy, and the Netherlands are the first to enjoy the free POP3 and SMTP service as part of Hotmail wave 3 roll out. Good news is, all Hotmail users should have POP3 and SMTP enabled and turned on in their account by end of 2009.

To setup mail client to access Windows Live Hotmail account, use the following Hotmail POP3 and SMTP configuration settings:

Incoming Server (POP3 Server): pop3.live.com
Incoming Server POP Port: 995
Incoming Server POP SSL Encryption: Yes (On or Required)

Outgoing Server (SMTP Server): smtp.live.com
Outgoing Server SMTP Port: 25
Outgoing Server Authentication: Yes (On – Use POP username and password or Hotmail credentials)
Outgoing Server TLS or SSL Secure Encrypted Connection: Yes (On or Required)


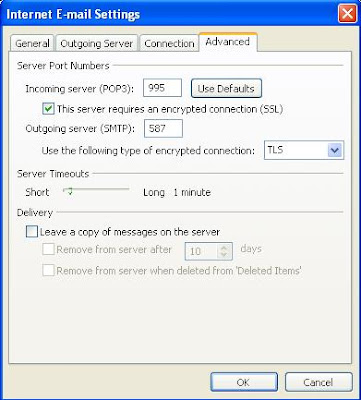
Note: Outgoing Server of Hotmail also supports port 587, useful for people who encounters error for STMP due to ISP blockage or any other reason.

User Name: Windows Live ID (e.g. yourname@hotmail.com)
Password: password used to sign in to Hotmail or Windows Live service

Note: “Log on using Secure Password Authentication (SPA)” check box in Outlook, Outlook Express or Windows Live Mail should not be selected.

Yahoo Configuring in Outlook

1. Login mail.yahoo.com

2. Click on Settings> Mail Option> POP & Forwarding.


Note: To download your Yahoo! Mail in an email client, such as Outlook, you need to upgrade your mail id to yahoo mail plus which is not a fee version.

you are a Yahoo! Mail Plus user you can. Here’s how to set up Outlook Express to read and send Yahoo! Mail Plus:

3. From the Tools menu, select Accounts.


4. Select the Mail tab. Click Add > Mail. This starts the Internet Connection Wizard.


5. In the Internet Connection Wizard, type your name as want it to appear when you send an email message, and then click Next.


6. In the E-Mail address box, type your Yahoo! Mail Plus email address (for example, testing80@yahoo.com), and then click Next.


7. In the E-Mail Server Names fields:

My Incoming mail server is a: Select POP3 from the pull-down menu.
Incoming mail (POP3, IMAP, or HTTP) server: Type plus.pop.mail.yahoo.com.
Outgoing mail (SMTP) server: Type plus.smtp.mail.yahoo.com.

Click Next.


8. In the Internet Mail Logon fields:
Name: Type your Yahoo! ID (your email address without the "@yahoo.com").
Password: Type your Yahoo! password.
Select the Remember Password checkbox if you don't want Outlook Express to prompt you for your password each time you check your mail.
Do not select the Log on using Secure checkbox.
Click Next. A screen appears telling you that you have successfully entered the information needed to set up your account.

9. Click Finish to save your account and exit the wizard.


10. The Yahoo! Mail outgoing mail server requires authentication. To turn this on, under Account, select plus.pop.mail.yahoo.com and then click Properties. A properties dialog box for the account appears.


11. Click the Servers tab. Under Outgoing Mail Server, select the My server requires authentication checkbox.


12. Click the Advanced tab.


Outgoing Mail Server (SMTP), select the This server requires a secure connection (SSL) check box. The Outgoing mail (SMTP) field, type 465 for the port number.

Incoming mail (POP3), select the This server requires a secure connection (SSL) checkbox. The port number in the Incoming mail (POP3) field usually changes automatically from 110 to 995. If it doesn’t, type 995 for the port number.

13. Click OK to save your settings.

14. Click Close to close the Internet Accounts dialog box.


You are now set up to send and receive Yahoo! Mail using Outlook Express.


Note: Troubleshooting tips - If you still can’t send Yahoo! Mail from Outlook Express, you might be accessing the Internet through an ISP that is blocking the SMTP port. If this is the case, try using port 587 when

Gmail Configuring in Outlook

1. Login in www.gmail.com

2. Click the settings> Forwarding and POP/IMAP


3. Select Enable POP only for mail that arrives from now on and click on Save Changes button.

4. Now logout www.gmail.com

5. Open Outlook.

6. Click the Tools menu, and select Account Settings...

7. On the E-mail tab, click New...

8. If you are prompted to Choose E-mail Service, select Microsoft Exchange, POP3, IMAP, or HTTP, and click Next.

9. Fill in all necessary fields to include the following information:

Your Name: Enter your name as you would like it to appear in the From: field of outgoing messages.
Email Address: Enter your full Gmail email address (username@gmail.com). Google Apps users, enter your full address in the format username@your_domain.com.
Password: Enter your email password.
Manually configure server settings or additional server types: Leave this option unchecked if you want to automatically configure Outlook 2007. If you want to manually configure Outlook 2007, check this box now. Google Apps users should configure manually as follows


10. Click Next. If you are configuring Outlook 2007 automatically, you're done! Just click Finish.


11. If you are configuring Outlook 2007 manually, select Internet E-mail and click Next.
12. Verify your User Information, and enter the following additional information:

Server Information
Account Type:
POP3
Incoming mail server: pop.gmail.com (Google Apps users, enter the server names provided, don't add your domain name in these steps)
Outgoing mail server (SMTP): smtp.gmail.com

Logon Information
User Name:
Enter your Gmail username (including @gmail.com). Google Apps users, enter your full address in the format username@your_domain.com
Password: Enter your email password.
Require logon using Secure Password Authentication (SPA): Leave this option unchecked.


13. Click the More Settings... button, and select the Outgoing Server tab.

14. Check the box next to My outgoing server (SMTP) requires authentication and select Use same settings as my incoming mail server.


15. Click the Advanced tab, and check the box next to This server requires an encrypted connection (SSL) under Incoming Server (POP3). Enter 995 in the 'Incoming Server' box.
16. In the Outgoing server (SMTP) box, enter 587, and select TLS from the drop-down menu next to Use the following type of encrypted connection:


17. Click OK.

18. Click Test Account Settings... After receiving 'Congratulations! All tests completed successfully', click Close.

19. Click Next, and then click Finish.


Congratulations! You're done configuring your client to send and retrieve Gmail messages.

Modem installation by Driver Files (.inf) in Windows Version

This installation procedure usually is followed for two reasons,


a) When we are going to install mobile handset as a modem in laptop or desktop pc.
b) The vendors of the modem provide driver files (.inf files based on different category of windows version) rather than an exe file to setup.

Follow the below statements to install modem from driver files (.inf) and create a Dailup connection to connect with internet.


Step 1]. Please click the right button on My Computer and click on Manage


Step 2]. Click on Device Manager and we will get two unknown Data Interface devices in Other devices. Note: Unknown modem is recognized as a Data Interface in Microsoft Windows OS.


Step 3]. Right click on Data Interface and click on Update Driver… to install the appropriate driver for the device.


Step 4]. Now, Hardware Update Wizard will be opened. Select Install from a list or specific location (Advance) and click Next button.


Step 5]. Select Search for the best driver in this location and click the Browse button to select the location of driver file. Click Next.


Note: Check the below picture, here three different folders are available. One is WinXp contents driver files for Windows Xp, another is Win Vista contents for Windows Vista and another one is Win2K contains driver files for Windows 7. This is the common way that followed by most vendor to provide their device drivers.


Step 6]. Click Continue Anyway button and wait for a few seconds,


Step 7]. Now you will get successful message of device installation


Step 8]. Same way install other Data Interface(s) and we will get all recognized devices (modem and ports)


Step 9]. Once the driver was installed please go to Control Panel and choose Phone and Modem Options to confirm whether modem installed properly or not.


Step 10]. Now, create a dailup connection to get internet connection. Click here to see the procedures to create a dailup connection in Windows.
Surfe.be - Banner advertising service